In this post I will document a small add-on board that I designed for the Atmel ATtiny104 Xplained NANO. I have also created a series of lessons that use the ATtiny104 XNANO with the add-on board to provide a basic introduction to embedded electronics and programming.

The ATTiny104 XNANO next to the small add-on board I designed to
enable a series of lessons on embedded development.
Introduction
In a previous post I examined the new ATtiny104 microcontroller from Atmel and checked out their evaluation board for it, the ATtiny104 Xplained NANO. I was very impressed by this little board. It has a programmer/debugger built in, allowing it to integrate seamlessly with Atmel Studio 7. You simply connect it to your computer with a USB cable to power the board, develop programs and connect to the USART. It is a great bargain at less than $5 USD.
It is not only suitable for evaluating the ATtiny104 but also for learning and teaching embedded electronics and programming. Certainly there are numerous Arduino and Arduino-like boards available for that task as well. This is just one more option that might be interesting if you need a very low-cost board that integrates with Atmel Studio for programming in standard C.
I designed a small add-on board for the ATtiny104 XNANO that includes a 5mm LED, a trimpot, and a photoresistor. The LED goes to one of the PWM-capable pins on the microcontroller, and the outputs of the trimpot and photoresistor circuit can be read using the ADC. These components combined with the on-board push button and LED allow for many lessons and projects to be completed. It's a very small and low-cost combo for learning or teaching embedded development.

The add-on board connected to the ATtiny104 Xplained Nano.
Lessons
To support the use of the add-on board, I have created a 28-page guide with eight lessons on basic embedded programming. The lessons walk you through using various features of the microcontroller and add-on board, including: digital inputs and outputs, the ADC, PWM output, USART, and interrupts. They are designed for someone that knows a little about electronics and programming, probably with an Arduino, and wants to get a feel for programming in Atmel Studio in standard C.

The guide to support the add-on board includes eight lessons on basic embedded development.
Add-On Board Kits
The add-on board makes for a very nice first soldering kit. The PCB is cheap ($6 USD for three copies from OSHPark) and the parts are very common, through-hole components. You probably already have all of this stuff on hand. The part outlines and resistor values are shown in the silk screen of the board so you don't even need to consult a schematic while assembling it.
ATtiny104 Xplained NANO boards can be acquired from distributors such as Digikey and Mouser. The PCBs can be ordered from OSHPark. Finally, the parts can be ordered from an online vendor such as Sparkfun.

Lesson #1 in the guide is soldering together your add-on board kit!
Motivation
Let me say now that this is not a Kickstarter or anything like that. I'm not planning to sell these kits or make any money off of the guide. The add-on board is Open Source Hardware, and the guide is released under the Creative Commons Attribution-Share Alike 3.0 license. I hope that the board and guide are useful for learning a little bit about programming microcontrollers and embedded design, whether that is for an individual reading this blog or someone that might use the board for a workshop or class. Feel free to modify and redistribute the guide to suit your needs, as long as you attribute and share it back to the community under the same license. I have also shared the Eagle files for the add-on board if you'd like to customize it.
Check out the guide to learn more about the lessons and what you can do with this add-on board.
Shared as Open Source Hardware (OSHW)
ATtiny104 Xplained NANO Add-On Board: Order PCBs on OSHpark!
Eagle Files and Lesson Guide: Shared on Github
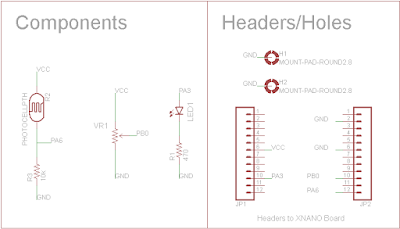
Schematic for the ATtiny104 XNANO Add-On Board
Parts list:
- 10kΩ trimpot with knob
- Small photoresistor (5mm width)
- 5mm LED (color of your choice)
- 470Ω resistor, 1/4 watt, 5%
- 10kΩ resistor, 1/4 watt, 5%
- (2) 12-pin 0.1” female headers (snap off from a strip of breakaway headers)
- (2) 12-pin 0.1" male headers for the XNANO board
Note: There are no component IDs in the silkscreen, but the outlines and resistor values are shown to clearly indicate where the parts go.
Headers on XNANO: I have noticed that one of the capacitors on the ATtiny104 XNANO board is a little too close to the header pins. Male headers might not seat all the way flush against the board. Luckily there is an easy fix. Use a file to slightly round the bottom corner of the header where it hits the capacitor. Just a few swipes with the file will allow it to seat fully. Also, I used male headers on the XNANO board and female headers for the add-on board, but you can reverse that if you like.
Headers on XNANO: I have noticed that one of the capacitors on the ATtiny104 XNANO board is a little too close to the header pins. Male headers might not seat all the way flush against the board. Luckily there is an easy fix. Use a file to slightly round the bottom corner of the header where it hits the capacitor. Just a few swipes with the file will allow it to seat fully. Also, I used male headers on the XNANO board and female headers for the add-on board, but you can reverse that if you like.

After you finish the lessons and remove the add-on board, many additional
projects can be completed with the ATtiny104 XNANO.
Wrap Up
I hope that you find this small add-on board for the ATtiny104 XNANO and the lesson guide useful. If you assemble one and work through the lessons, or use them in a class or workshop, please let me know. Also, please post any questions and comments down below.
Thanks for reading!
- Dan W.